
Two great ways to repurpose common waste materials
By Louise Costa
On any given day, tonnes of waste are removed from our home and work sites, pushed into massive holes (nicely called landfill) and left to decompose before being covered in soil, thus contributing to the toxicity of the earth’s surface (I can’t believe the planet isn’t actually getting bigger). Some of this waste, however, has value and potential for a revived purpose, keeping it out of the hole and reducing demand for high-energy production of new items at the same time. Here are some ideas to help transform waste into meaningful matter.
Gabian-style retainer walls and seats
Materials
• 150–200mm x 800mm square or round timber posts (for seats and retainer walls)
• Weld-mesh sheets (can be galvanised or black steel), ensuring the holes are small enough to hold the filling
• Filling material — something that doesn’t break down too quickly, such as stone, tin or glass
• Low-tensile, flexible 2mm wire, barbed staples, coach screws, which may have to be purchased new from the hardware, depending on what sort of Steptoe you are (I know people who straighten nailsi!i)
Method
• Working towards a finished height of 400–450mm, cut timber posts into lengths of 800mm for seats or 1000mm for retainer walls.
• Dig holes to suit post diameter to a depth of 400mm for seats or 600mm for retainer walls.
• Space the posts no more than 2 metres apart or less according to the size of your mesh sheets.
• Drop in the posts and ram in the sides with a mixture of clay and dry builder’s cement, making sure the posts are level both vertically and in relation to each other.
• Cut sheets of mesh for both front and back of seat or wall to the height of posts and secure ends with barbed staples to the centre vertical line of the post so that mesh is not over-hanging. The sheets should be the same distance apart as the thickness of the post.
• Use flexible wire to tie the front sheet to the back sheet through the middle. This will stop them from bulging when the space is filled. You will have to work around the wires when filling.
• Use stone, pebbles, rusty tin cans, glass bottles, pine cones or anything else you can think of to fill the space (a mix of small and large material will ensure there aren’t too many gaps).
• For seat-top construction, attach a 200– 250mm-wide board to tops of posts using 125mm coach screws. Shape and sand.
• For wall construction you can get fancy and cap it off with some odd-shaped stone. Voila!
Paving with broken bricks and concrete
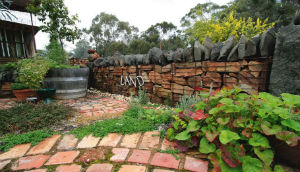
There are not many things more functional and beautiful in a garden than an area paved with hand-made, solid red bricks. Trouble is, these gems are getting harder to find and when you do find them they can cost a premium fee. So have you considered using the broken ones?
Broken bricks can be easily shaped into cobbles (small squares), which makes them more versatile for a variety of paving patterns, such as concentric circles, scallops and sinuous curves. They are easier to handle and can usually be found for free! The other treasure for paving material is broken concrete. It gives the effect of “crazy paving” and, if the pieces are from an old path, can look historic the minute it’s laid. Again, this material is often considered waste so can be sourced for free.
Materials
• Broken solid red bricks
• Broken concrete (all shapes and sizes)
• Stone dust
• Cement
• Brickies’ sand
Handy Tools
• Steel rake
• Rock hammer or bolster and hammer
• Rubber mallet
• Long and short spirit levels
• Aluminium or timber straight edge
• String line and pegs
Method
The key to a good paving job is preparation! That means working tirelessly on the subsurface levels. If you don’t do this, not only will the pavers be difficult to lay, but the finished surface will hold water, sink and create trip hazards.
• Using stone dust (AKA cracker dust) to a depth of 60–70mm, cover the area roughly and screed with your straight edge to a level or slope for water-shedding, before compacting.
• With the string line and rubber mallet, form a paving border (this will make it easier to maintain your levels) using unbroken bricks in header edge or soldier course formation.
• Fill in the area with a fabulous design using the broken bricks or broken concrete or both. Use the straight edge between the borders along the sides of the area to ensure the in-fill area stays level. Maintain a 10mm gap around all the pavers.
Grouting
• In a wheelbarrow, make a dry sand/ cement mix at 3:1 ratio (like mixing a cake).
• Carefully pour the dry mix onto the finished paving and sweep into the gaps.
• Lightly hose the area until saturation point, wait until the surface is dry then repeat the sand/cement mix process until all the gaps are filled.
• Keep the area damp for 2–3 days after the grouting process.
• Drag a deckchair onto the area and crack a bottle of bubbly to celebrate.


